01 Feb How to Change Rear Brake Pads
Mastering the unglamorous art of making your Honda stop.
By Brian Gillespie
Photos by Kiana Toscano
Your rear brakes have been squealing for a week now. Your girlfriend’s getting irritated, but you know that if you take it to the local shop, they’re going to put your car on the lift and hand you a laundry list of other stuff that needs replacing. Sure, some of that stuff might need fixing sooner or later, but there’s nothing wrong with concentrating on what’s wrong now and waiting on that other stuff until you’ve got more time, money or motivation.
The front brake pads on most Hondas wear a little quicker than the rears do. But the rears do wear out, and there’s a handy little tab on the inner pad that makes a nice squealing sound when they’re getting close to their wear limit. Don’t ignore that squeal. If you wait too long, the tab can break off, and the next sound you’ll hear will probably be its metal backing plate scraping against the rotor. And you thought that squeal was loud. Tsk, tsk.
Changing pads is something anyone can do with just a few simple tools. Follow along and we’ll show you how.

Here's what you'll need: a 12mm socket, ratchet, and short extension; a 19mm lug-nut socket and ratchet; a 17mm open-end wrench; a torque wrench; some brake cleaner; and a brake piston tool. More on that last one later. Depending on the condition of your rotors, you also might need an impact driver to remove their screws and measuring calipers to find out how thick they are.

This special disc brake piston tool makes changing rear pads a whole lot easier. You'll probably have to buy one. This one is universal and sells for about $20. There are also Honda-specific ones, but what if you start dating that girl that drives the Bimmer? Or, more likely, the one with the Hyundai? The really old Hyundai. You might just be changing her brakes someday so get the universal one.

Along with the pads, make sure you've got some brake caliper grease. Some pads come with it, some don't.

While the car is still on the ground, break the lug nuts loose. This is a lot harder once the wheels have been raised.

With a front wheel chocked and the parking brake released, jack up the car and raise the rear wheels off the ground.

Be sure to use jack stands to safely support the rear of the vehicle. Using a floor jack alone is inviting disaster.

Remove the hex bolt that fastens the brake hose to its bracket using a 12mm socket. If you don't, there won't be enough slack in the hose to remove the caliper from the rotor.

Remove the two bolts that hold the caliper its slider pins. If the pins start to rotate once the bolts have been loosened, use a 17mm open-end wrench to hold them in place.

Here's a pro tip: invest in a magnetic tray to keep your nuts and bolts in one place. These things can be had for around $10 from Sears or Harbor Freight Tools.

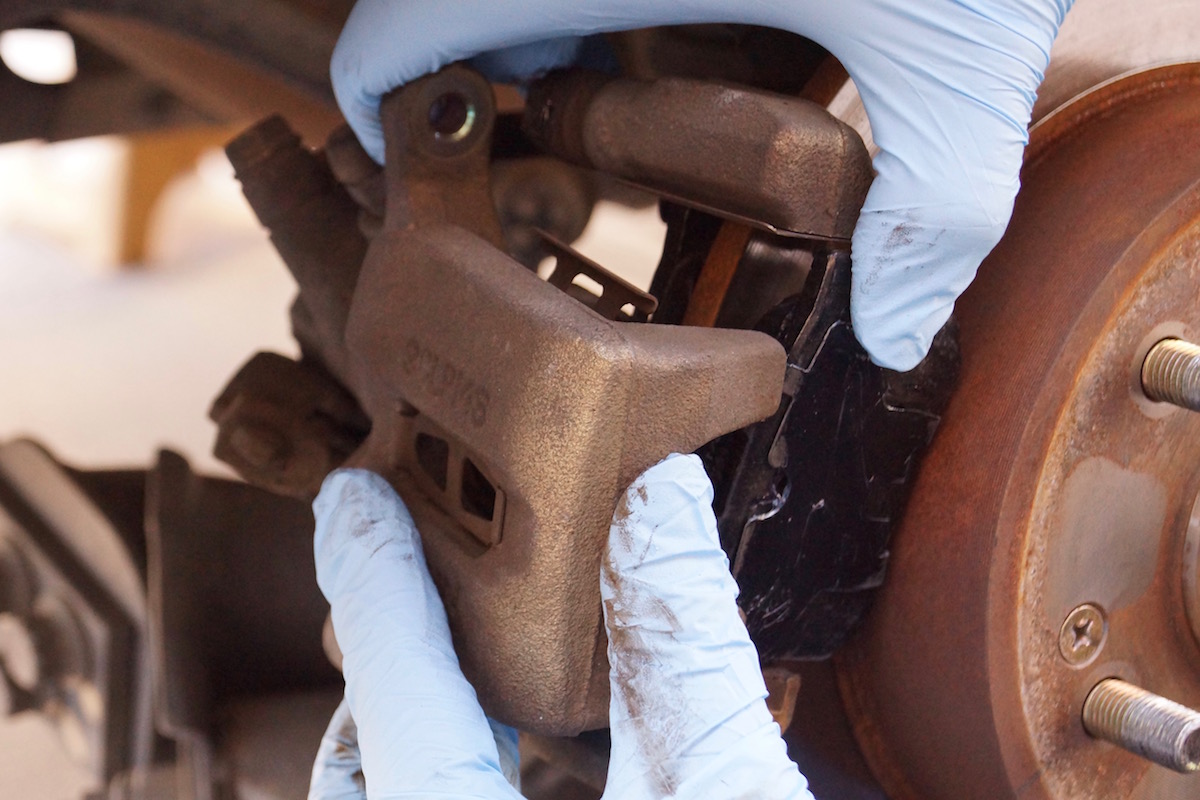
Slide the caliper away from the rotor. If it doesn't want to come off, it's probably because you didn't listen when I told you not to set that parking brake.

Slide the old pads out of the caliper bracket. Now, chuck them in the garbage. Wait, not yet.

See that metal tab hanging from the end and looping back toward the pad's surface? That's what's been making that screeching sound. Okay, now you can throw them away.

Inspect the rotor's surface. If it's got a lot of waves or a lip at its outer edge that you can catch with your fingernail, you may want to have it turned. A lot of shops offer rotor turning services. This gives the pads a new surface to grip to when braking. Check the price on new rotors, too. There's no sense in having rotors turned if it'll cost you about the same for new ones . Rotors range from about $20 each on Amazon to about $110 from the dealer.

Rotors thinner than 8mm should never be resurfaced. Use an 8mm open-end wrench to check the rotor's thickness. An 8mm wrench actually has an 8.25 - 8.3mm opening. In this case, the wrench barely fits, so even without breaking out the calipers to measure, it's obvious that the rotor's a little thicker than 8mm. That's getting thin, but it's still within spec. If there's any question, though, run them down to the local parts store and have them measured. You're probably not going to die in a fiery wreck if your rotors are too thin, but don't chance it.

There are two pins that allow the caliper to slide while the brakes are applied to keep forces even on both sides: one on the top and one on the bottom. Pop them out of their accordion-shaped, rubber dust boots and remove them.

Hose them down with some brake cleaner and remove any grease or dirt.

Use caliper grease to lubricate them. And don't use your dirty finger to do it. You just cleaned them; don't add dirt to the fresh grease.

Slide both pins back in place and be sure to snap their dust covers back into their grooves.

As brake pads wear, their pistons self adjust outward, removing potential slack. The brake piston tool has four little nubs that grab ahold of the piston, allowing you to screw it back into its caliper, which compresses it and makes room for the new, thicker brake pads. It's compatible with any 3/8-inch ratchet and short extension to allow you to reach the piston.

But before screwing that piston back down, inspect the rubber seal and make sure that it isn't stuck to it. Otherwise it could twist and tear. Push it back from the edge of the piston and make sure it's free. If necessary, use a bit of caliper grease to lubricate it.

Using your new brake piston tool, screw the piston down about three or four complete turns.

This little nub on the backside of the inner brake pad will hang up on the caliper if the piston isn't aligned properly.

When screwing the brake piston down, be sure to align one of its grooves radially so the pad's nub slips along the grove as the caliper's installed. But we're not ready to put it all back together just yet.

While you're still in a lubing mood, apply some caliper grease to the back of the pads—the back-side only. Take care not to get any on the friction surface.

Put a nice coating on. This actually helps reduce squeeks.

Slide the pads into place on the caliper bracket. There's a thin metal retainer clip that'll help hold them in place. If yours are missing or broken, you can pick up new ones from the dealer.

Now slide the caliper over the pads. If it doesn't fit, you may need to screw the piston in another turn or two.

Screw the two caliper bolts back into their caliper pins.

If the bolts or threads are a little crusty, you might need to hold the pin using a 17mm open-end wrench. Tighten the bolts to 16 lb-ft of torque.

Using the remaining hex bolt, reattach the hose to its bracket on the lower control arm. Tighten that to 16 lb-ft of torque, too.

Now go and do the other side. It'll probably take you half as long. Once you're done, put the rear wheels on, remove the jack stands, and be sure to tighten the wheels' lug nuts to 75-80 lb-ft of torque. By the way, this is probably the number-one rookie mistake made.
Well, well, well. You’ve done it now. Don’t blame me if everyone you know now asks you to help them with theirs. You can always just send them here instead and rent them your piston tool while you’re at it.
No Comments