12 Jun ECU Pin Removal Guide
Do it like a pro.
By Brian Gillespie
Photos by Carter Gillespie
As I was plinking out part two of Project RSX’s auto-to-manual-swap on my keyboard, the subject of ECU pin removal came up. I made a quick look around the interwebs for an ECU pin-removal how-to to link to, but there were no good explanations of the procedure; just a whole lot of “I use a paper clip and dig around ’till it comes out” posts. Yeah, right. That’s not going to work.
Almost anytime you’re doing an engine swap or a manual-transmission conversion, you’ll need to make changes at the ECU. This usually means adding, removing, or switching pins around at the ECU’s plugs.
I’ve worked on a few-hundred harnesses over the last 17 years, so here it is: the definitive ECU pin-removal guide. It starts with the OBD0 plugs used as far back as 1985 on the Civic Si and goes up to the current generation of cars with their under-hood ECUs.
The list of tools required to work on any of the following ECU plugs is short. Here’s what I use:
- Straight pick tool
- Right-angle pick tool
- Honda ECU pin-removal tool: Honda PN o7JAZ-002010A
- Precision slot screwdriver with 1 mm-wide blade

The only ECU pin-removal tools you'll ever need: straight and right-angle picks, Honda's own pin-removal tool, and a precision slot screwdriver.
The pick tools you can buy anywhere, but the Honda ECU pin-removal tool and the precision slot screwdriver are special. If you’re not going to work on OBD0 harnesses, don’t bother buying that Honda tool. If you are, use the part number listed above and order it from your local Honda dealer. The precision slot screwdriver is a must-have, though. I don’t advise using it for anything other than lifting the connectors’ small plastic tabs when removing their pins. In spite of its tool-steel construction, it can easily break. This one’s from Wiha and is much stronger than most. Here’s a link to buy it.
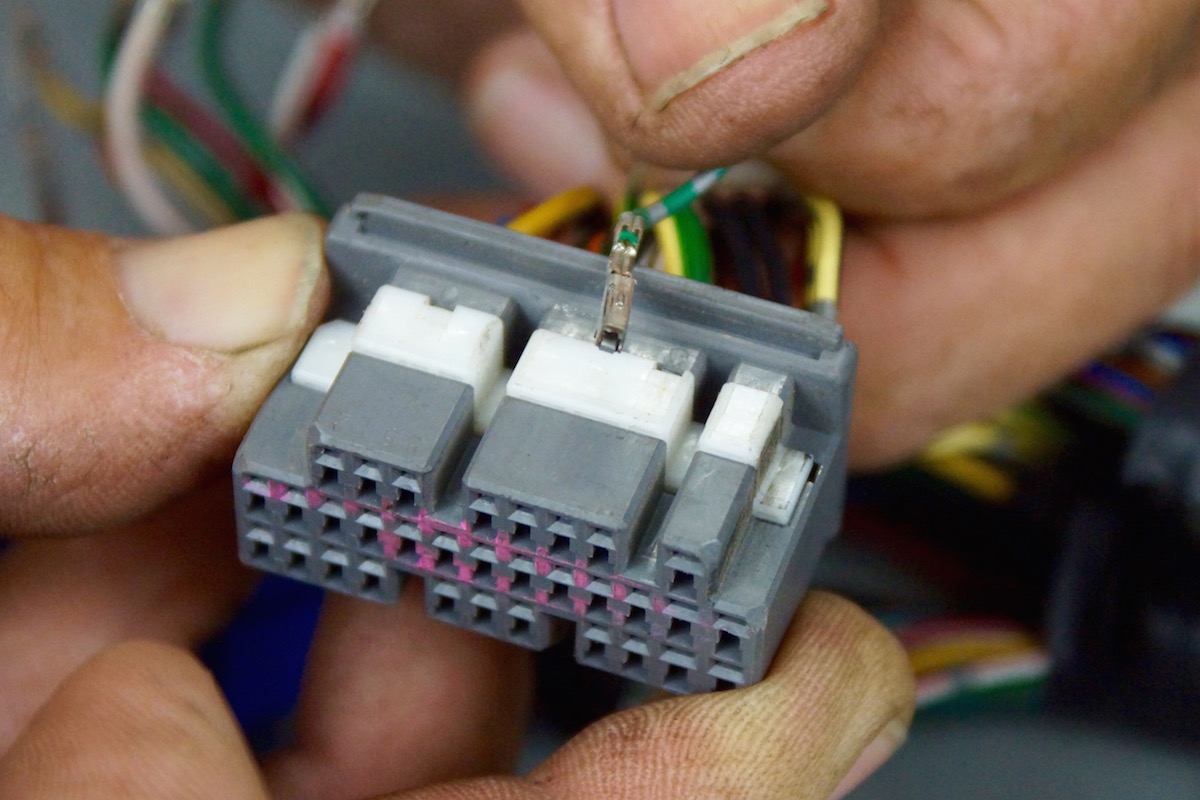
OBD0 (pre-OBD)
These plugs can be found on ’85-’91 Civics and ’87-’91 Integras. Identifying the A plug is easy; it’s the only white one out of the three. Inside each pin opening is a little tab that prevents its respective pin from being pushed out of the back when plugging it into the ECU. The tabs are located toward the center of the plug and can be accessed through the opening between the upper and lower pins.

A look inside of an OBD0 A plug's opening with its pins held in place by their respective retaining tabs, one of which you can see just above the pick tool.
Using the straight pick tool, slide it in and against whatever pin you want to remove. You’ll feel it when it hits the tab. Lift the tab and gently pull the wire attached to the pin to remove it. Pulling on the wire before lifting the tab will lock the tab and pin in place. So don’t do that.

Slide the straight pick tool into any one of the A plug's openings and lift its corresponding retaining tab to release its pin.
With the pin removed, its rectangle-shaped opening that the tab grabbed onto to hold the pin in place is obvious.

Here you can see the opening in one of the A plug's pins that the tab held in place.
The black B and C plugs are a little different. They use a much smaller pin, probably due to lower electrical current requirements. There’s a white retaining lock (or clip) that needs to be removed first.

Each side of an OBD0 B plug features a tab that must be released before its retaining lock can be removed.
Using the pick tool, depress the tabs on the side of the retaining lock and push them up and out. There’s an opening on each side of the connector you can use to poke at them with the pick.

Here, an OBD0 B plug's tab is depressed to allow its retaining lock to be removed.
Once the tabs are freed up you can pry the lock out.

With the tabs released, the retaining lock can be pried away.
With the lock out, we’re ready for the next step.

Here the retaining lock's been completely pulled away.
You’ll need Honda’s special pin-removal tool to go any further, which was designed to slide along the pin and depress a little metal tab that holds it within the ECU connector.

Unlike other ECU plugs, here the tab is integrated onto the pin. The tool's finger protrusion contacts the tab, releasing the pin.
Slide the tool into the rectangular opening between the top and bottom rows of pins with its finger protrusion oriented toward the pin you want to remove.

Slide the Honda ECU pin removal tool into the B plug, ensuring that the tool's finger protrusion is facing the pin that'll be removed, which in this case is on the plug's upper side.

Honda's ECU pin tool in action, depressing a pin's retaining tab.
When the tool bottoms out, it will depress the metal tab, allowing you to gently pull the wire from the back of the connector.

The last step is to gently tug the wire and remove the pin from the plug.
OBD1
OBD1 electronics are the most common and can be found on ’92-’95 Civics and Integras. OBD0 and OBD2 cars are often converted to OBD1 so they can use programmable ECUs like Hondata, NepTune, and Crome. Here, you’ll only need two tools: the straight pick tool and the precision slot screwdriver. There are two flaps on the wire-side of the connector that lock the pins into the connector as well as a small tab inside the connector for the individual pins.
Start by prying the lock flap near the connector’s ends to unlock it.

This is the lock that helps hold an OBD1 ECU plug's pins in place. Unlock it by prying it up.
With the lock flap opened, individual pins can be removed. The lock flap can often crack and break off on older cars. Even if it breaks off, you can reinstall it after you’re done, which will keep the pins from being dislodged accidentally.

The pin lock open and out of the way.
Slide the precision slot screwdriver along the metal pin until you feel the plastic retaining tab. There are both large and small pins in each plug, but the procedure is the same for both.

Start by inserting the precision slot screwdriver into the front of the connector.
Once you feel the tab, gently pry it away from the pin.

Continue to slide the precision slot screwdriver into the opening until you feel the tab.
With the tab lifted, slide the wire out of the back. If it doesn’t come out with a gentle tug, you probably don’t have the tab out of the way.

If the wire and pin don't come out with a gentle tug, the tab is probably still engaging the pin.
OBD2A and OBD2B
If you’re running an S2000, ’96-’01 Integra, or ’96-’00 Civic, these are your plugs. The two tools you’ll need are the right-angle pick and the precision slot screwdriver. The lock is a little different on this plug than any of the others. There are three levels of pins so the clip is internal within the connector.
Use the right-angle pick to pry the lock up. There are some small notches you can insert the pick tool into to lift the lock.

When working with OBD2 plugs, start by prying the lock up using the right-angle pick tool.
Once the lock is up, insert the precision slot screwdriver into the opening next to the pin until you feel the plastic retaining tab.

Slide the precision slot screwdriver into the connector until you feel the retaining tab.
Next, lift the tab away from its pin. It may take a few times to get a feel for what’s happening. Don’t press the screwdriver too hard; it can damage the small plastic tab.

Next, pry the tab away from its pin to release it.
With the tab lifted, gently pull the wire out from the back of the plug. If it doesn’t come out easily, try lifting the tab again.

While lifting the tab, gently pull the wire to remove the pin. Here it's free to be repurposed or removed.
OBD2C
K-series and early J-series ECUs use this plug. In terms of how its locks work and how its pins are removed, it’s almost identical to OBD2A and OBD2B connectors. The pins are smaller, though, and the plug a little more delicate. Don’t use excessive force. With some practice you can do this without doing any damage to the plastic.
Again, to unlock the connector, insert the right-angle pick into the small notches and gently pry up. Be careful not to damage the plastic.

Here an OBD2C's lock is pried up using the right-angle pick tool.
This is why I chose the 1 mm-wide precision slot screwdriver for lifting the tab on ECU connectors. The opening is barely 1 mm across. Slide it along the metal pin until you feel the tab.

Insert the precision slot screwdriver into the ECU plug to gain access to the tab.
Once you feel the the tab, pry it away from the pin to release it.

Once inside, use the precision slot screwdriver to lift the retaining tab.
Now the wire and pin can be pulled out of the connector.

As before, remove the pin by gently pulling its respective wire from the ECU connector.
OBD2D?
Is OBD2D what we’re going to call what the current Civics have? Hell, I’ve lost track. This is the type of connector you’ll find on ’06-and-up Civics. If you’re doing a swap in your CR-Z or second-gen Fit, this is also for you.
Although I don’t have a picture of it, you’ll need to start by taking the plastic guard off the backside of the plug. This way you can get to the wires so you can pull them out of the back of the plug.
This is a big honkin’ plug, but it’s no more difficult to work with than K-series plugs. The one we’re working with already had its plastic guard removed from the back.

Under-hood ECUs use larger plugs like this. They come in a couple of sizes but all work the same.
The lock can be lifted using the right-angle or straight pick tool.

Use the pick tool to lift the pin lock.
You can see the metal pins pretty easily. I feel like a broken record, but slide the precision slot screwdriver along until you feel the tab.

Insert the precision slot screwdriver into the opening just above the pin to access the retaining tab.
Once again, lift the tab and remove the wire.

Gently lift the tab to release its pin.

Here the pin's been removed from its connector, allowing it to be relocated to another spot or removed altogether.
See, I told you. There it is. You now know more than most of the self-proclaimed internet swap gurus. Time to impress your friends with your newfound knowledge.
No Comments